Conductivity cells, also called conductivity electrodes or probes, are constructed with metal electrodes placed at a fixed distance in either glass or plastic body and surrounded by an outer tube. The distance between the electrodes divided by their surface area is known as cell constant. HORIBA offers two-electrode conductivity cells with cell constants expressed in cm-1 and m-1 units.
The cell constant and performance of a conductivity cell may degrade over time due to fouling of electrodes or peeling of their platinum black coating. To maximize the performance of a conductivity cell and extend its life span, proper care and regular maintenance are equally required
 1M Hydrochloric acid (HCl) 1M Hydrochloric acid (HCl) |
Mild deterg ent ent
|

Clean water (e.g., tap, distilled or deionized water) in a squirt bottle
|
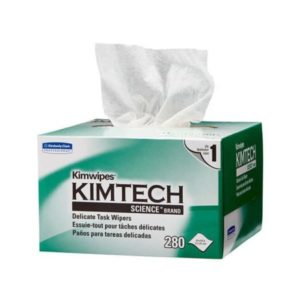 Soft lint-free tissue Soft lint-free tissue |
Refer to the safety data sheet (SDS) of the chemical solution to be used in cleaning and wear the appropriate personal protective equipment for safe handling.
Selection:
1. Cell Type
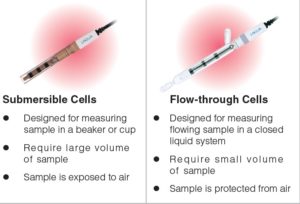
HORIBA has two types of conductivity cells—submersible and flow-through. The differences between the two conductivity cells are outlined in the table below.
2. Cell Constant
Each type of conductivity cell has four models with 0.1 cm-1 (10 m-1), 1.0 cm-1 (100 m-1) and 10 cm-1 (1000 m-1) cell constants. When selecting a conductivity cell, check the expected conductivity of the sample. Then look at the cell constants of conductivity cells. Choose a conductivity cell that covers the expected sample conductivity. The higher the conductivity value of sample, the higher the cell constant required. A conductivity cell with 1.0 cm-1 (100 m-1) cell constant is the most commonly used because it measures low to high conductivity.
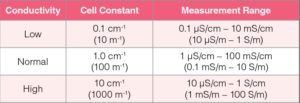
- Typically, a low conductivity solution is measured with a flow-through cell having a 0.1 cm-1 (10 m-1) cell constant to prevent absorption of carbon dioxide (CO2) from air, which can affect the conductivity value.
- A high conductivity solution is measured with a submersible cell having a 10 cm-1 (1000 m-1) cell constant in a beaker.
3. Body Materials
To avoid compromising the appearance and performance of a conductivity cell, check the chemical components of the sample. The chemical components of the sample must be compatible to the wetted materials of the conductivity cell body. All HORIBA conductivity cells are glass-body, except 9382-10D.
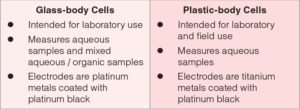
- Glass-body conductivity cells are chemical-resistant. They can be used in aqueous samples as well as in samples containing organic solvents.
- Plastic-body conductivity cells are durable and rugged, making them ideal for field measurements.
- Conductivity cells with platinum electrodes are the best choice for chemically reactive solutions whereas those with titanium electrodes are suitable for low reactive aqueous solutions.
4. Temperature Sensor
Conductivity is highly temperature-dependent. A conductivity cell with built-in temperature sensor allows simultaneous measurement of conductivity and temperature. All HORIBA conductivity cells have built-in temperature sensor, except 3573-10C and 3574-10C.
- The temperature sensor detects the temperature of the solution being measured.
- The conductivity meter accepts the temperature reading to automatically correct or normalize the conductivity reading.
Conditioning
The electrodes of conductivity cells are coated with a layer of platinum black. The platinum black creates a higher effective surface area for the electrodes and eliminates polarization error. If the platinum black is dry, dirty, or peeled off, it will adversely affect the conductivity measurement.
- Prior to use, soak the conductivity cell in clean water (e.g., tap, distilled, or deionized water) for at least 1 hour, if the platinum black is dry. Make sure that the water level is right on the mark indicated in the cell body or it fully covers the electrodes.
- Note that the 9382-10D plastic conductivity cell is soaked in pure water when shipped to prevent the platinum black from drying.
Calibration and Measurement
- Prior to calibration, select the desired measurement unit and enter the cell constant (indicated on the cap of the conductivity cell) into the meter settings.
- Before and after measurement of each solution (standard or sample), rinse the conductivity cell with clean water and/or with a portion of the next solution to be measured. If water is used in rinsing, wipe the conductivity cell with a tissue to remove excess water. Rinsing between measurements prevents cross contamination.
- When immersing the conductivity cell in a solution, make sure that the solution level is right on the mark indicated in the conductivity cell body. If there is no marking indicated in the body, make sure that the metal electrodes are completely immersed in a solution.
- Calibrate at least once a day using a fresh standard solution that has a conductivity value as close as possible to the expected sample value. After calibration with a standard solution, the meter will display a calibrated cell constant. The calibrated cell constant should be within ±10% of the nominal cell constant. The conductivity standard solution should give a reading of expected value ± 5%.
- HORIBA meters allow calibration within ±30% of the nominal cell constant.
- To detect temperature and compensate its effect on conductivity, use a conductivity cell with built-in temperature sensor. If the conductivity cell has no built-in temperature sensor, check the solution temperature using a calibrated thermometer and enter that temperature into the meter.
- Stir conductivity standards and sample at same rate. Stirring provides representative conductivity value of a solution. If stirring is not possible due to limited sample volume or other reasons, it may be abandoned in both calibration and measurement.
- Dislodge any bubbles formed inside the conductivity cell.
Cleaning
A clean conductivity cell is necessary in performing an accurate conductivity measurement. The choice of cleaning solution should effectively remove all contaminants based on sample tested without damaging the conductivity cell.
Clean the part of conductivity cell in contact with sample using the appropriate solution. Then rinse it thoroughly with clean water. Abrasive objects should never be used in cleaning. A piece of cotton soaked in a cleaning solution can be used with caution.
- General samples – Simply wash the conductivity cell with clean water. If there are sample residues clinging to the conductivity cell, immerse the conductivity cell in diluted detergent solution for 5 to 10 minutes while moderately stirring the solution.
- Oily samples – Immerse the conductivity cell in warm, diluted detergent solution for 5 to 10 minutes while moderately stirring the solution. Alternatively, wash or wipe the conductivity cell with acetone or ethanol.
- Note: Never soak the plastic-body conductivity cell in organic solvents such as alcohol, acetone etc. because these solutions may damage it. Also, this action will void the warranty.
- Lime or hydroxide-containing samples – Soak the conductivity cell in 1M HCl for 30 minutes. Alternatively, soak the conductivity cell in detergent solution containing 5% household bleach for 30 minutes.
Storage
Conductivity cells should be clean before they are stored for any length of time.
- Short-term: Between measurements and overnight, store the conductivity cell in clean water. Before inserting the conductivity cell into the protective cap, place sufficient amount of clean water to cover the metal electrodes. Those conductivity cells without protective cap (i.e., 3551-10D & 3553-10D) can be soaked in a beaker containing clean water.
- Long-term: Store the conductivity cell dry. Make sure to perform conditioning before use (See Conditioning).
- Avoid storing the conductivity cell in places with direct sunlight or high temperature and humidity.

